


Security is not an afterthought in system design; it is a foundational pillar. When architects and developers map out how different components of a system interact, they often focus on functionality. However, the security layer—specifically authentication—requires equal attention. Communication diagrams provide a clear visual language for these interactions. By integrating security flows into these diagrams, teams gain a shared understanding of where trust is established, how credentials are handled, and where vulnerabilities might arise.
📊 Why Visualize Security?
Diagrams serve as a contract between design and implementation. When authentication flows are explicitly drawn, several benefits emerge. First, it highlights trust boundaries. Second, it ensures that every data exchange is scrutinized for sensitive information. Third, it helps identify gaps in validation logic. Without a visual representation, security requirements can become buried in documentation, leading to implementation errors.
🛡️ Understanding Trust Boundaries
A communication diagram is essentially a map of data movement. To secure this map, you must define where trust ends and where it begins. Trust boundaries represent the perimeter of a security domain. Any message crossing a boundary requires authentication or authorization checks.
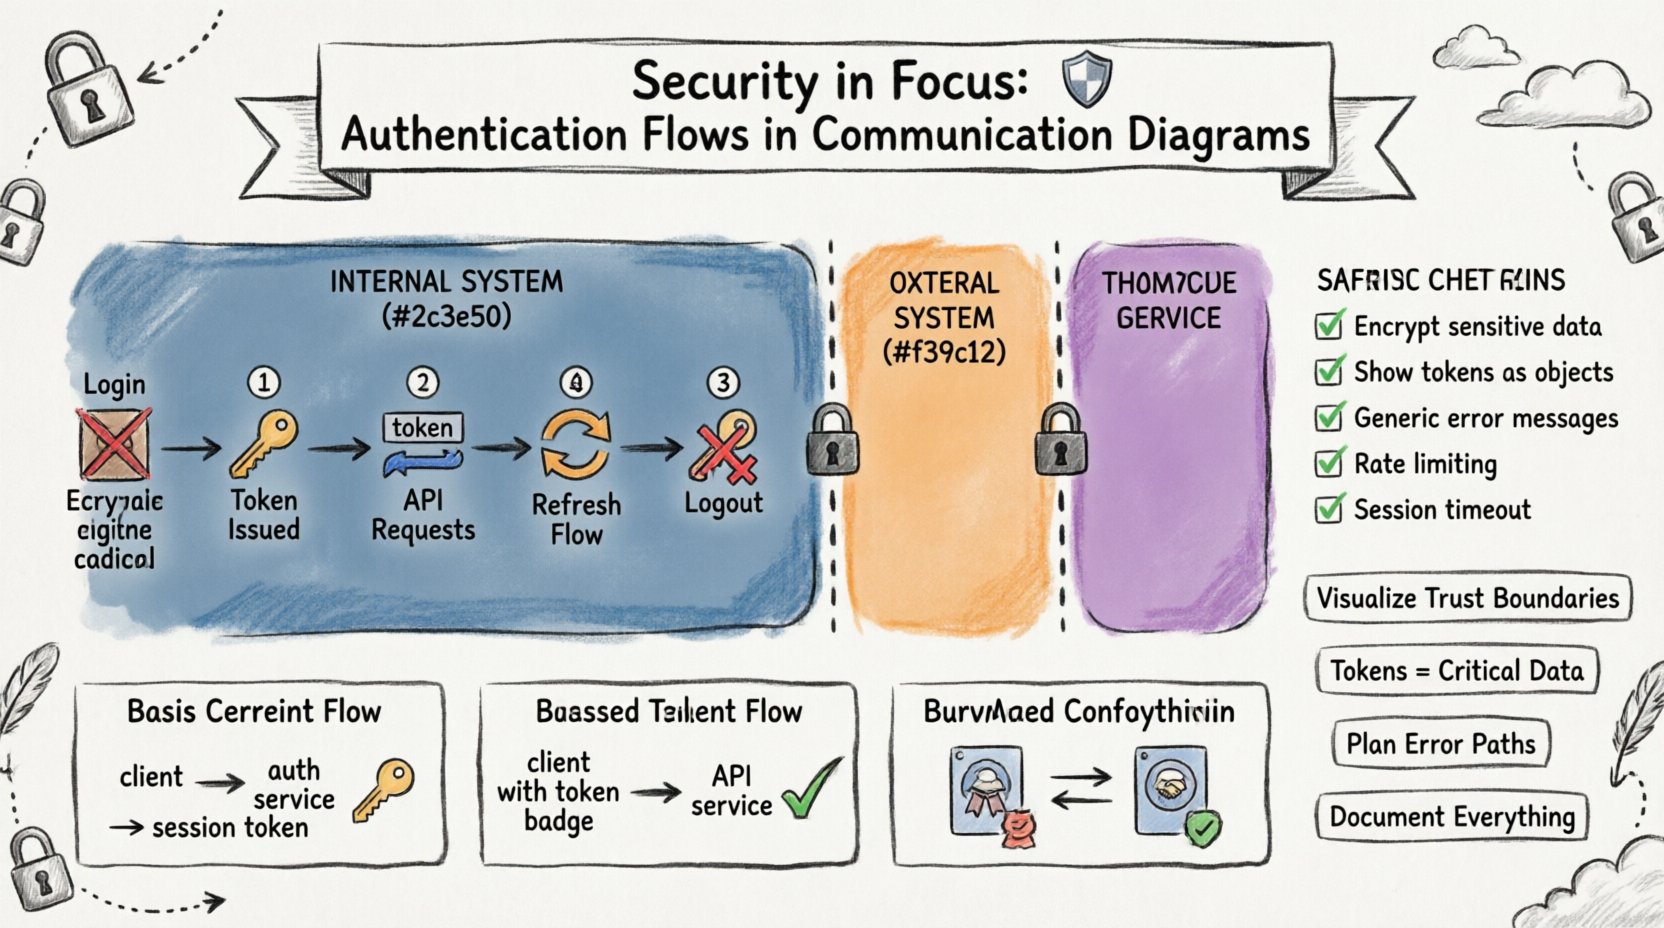
- Internal Boundaries: Communication between services within the same security zone. These might require mutual authentication but less strict validation.
- External Boundaries: Communication crossing from a public network to a private server. These require rigorous authentication, encryption, and input validation.
- Third-Party Boundaries: Interactions with external systems. These often involve delegated authentication flows.
When drawing a diagram, use distinct visual cues to separate these zones. This visual separation forces the designer to ask: “Does this message require a security token?” If the answer is yes, the diagram must show the token exchange.
🔑 Authentication Mechanisms in Flows
Different systems require different methods to verify identity. A communication diagram should reflect the specific mechanism used for each interaction. Generic lines often hide critical security logic.
1. Basic Credential Exchange
In simpler systems, a client may send a username and password directly to an authentication service. This flow is straightforward but requires strict encryption during transit.
- Client: Initiates login request.
- Auth Service: Validates credentials against a database.
- Client: Receives a session token.
This flow is suitable for initial logins but should not be repeated for every subsequent action. The diagram should show the transition from credential submission to token receipt.
2. Token-Based Authentication
Modern architectures often rely on stateless tokens. The client receives a token after successful authentication and includes it in subsequent requests.
- Request Header: The token is passed in a specific header field.
- Validation: The receiving service verifies the token signature.
- Expiration: The service checks if the token is still valid.
Visualizing this involves showing the token being passed from the Authentication Service to the Client, and then from the Client to the Application Service. This makes it clear that the application service does not handle passwords, only tokens.
3. Mutual Authentication
In high-security environments, both parties must prove their identity. This is common in service-to-service communication.
- Certificate Exchange: Both sides present digital certificates.
- Key Validation: Each side verifies the other’s key.
- Session Establishment: A secure channel is opened only after validation.
In a diagram, this requires showing a two-way handshake before the actual data payload is transmitted. This adds depth to the security narrative of the interaction.
🔄 Visualizing Token Exchange Flows
The flow of tokens is the most critical part of an authentication diagram. If the token generation or validation is unclear, the system is prone to attacks.
The Login Sequence
Start with the client sending credentials. Do not draw the credentials as plain text. Indicate that they are encrypted or hashed.
- Step 1: Client sends
POST /loginwith encrypted payload. - Step 2: Server validates against the identity store.
- Step 3: Server generates a unique token.
- Step 4: Server returns token to client.
Label the return message as “Token Issued”. This clarifies that the password is no longer in the system.
The Refresh Sequence
Tokens expire. The diagram must show how a new token is obtained without re-entering credentials.
- Step 1: Client detects token expiration.
- Step 2: Client sends refresh token to Auth Service.
- Step 3: Auth Service validates refresh token.
- Step 4: Auth Service issues new access token.
This flow prevents users from being logged out frequently while maintaining security. In the diagram, distinguish between the Access Token and the Refresh Token using different labels or colors.
The Logout Sequence
Security also involves termination. A diagram should show how a session is invalidated.
- Step 1: Client sends logout request with current token.
- Step 2: Server marks token as invalid in the session store.
- Step 3: Server confirms logout.
Without this step, a stolen token might remain valid indefinitely. The diagram serves as a reminder to implement this cleanup logic.
📊 Message Types and Security Implications
Not all messages in a communication diagram are equal. Some carry sensitive data, while others are routine. The table below outlines common message types and their security requirements.
| Message Type | Security Requirement | Diagram Notation |
|---|---|---|
| Authentication Request | Encryption, Input Validation | Label: Encrypted Payload |
| Token Issuance | Secure Channel, Signature | Label: Secure Token |
| Data Retrieval | Authorization Check | Label: Auth Required |
| Configuration Update | Privilege Escalation Check | Label: Admin Only |
| Logging Event | Sanitization (No PII) | Label: Sanitized Log |
Using these labels in your diagrams creates a quick reference for reviewers. It forces the team to consider what data is moving and whether it is protected.
🚫 Error Handling and Security Warnings
Security is often tested during failures. A robust diagram includes error paths. If an authentication attempt fails, the system should not reveal too much information.
Generic Error Messages
When a login fails, the diagram should show a generic response. Do not indicate whether the username or password was incorrect.
- Incorrect: “Username not found”.
- Correct: “Invalid credentials”.
This prevents attackers from enumerating valid usernames. In the diagram, label the error response clearly to ensure developers do not accidentally expose specific error codes.
Rate Limiting
Brute-force attacks are common. The diagram should indicate where rate limiting occurs.
- Location: At the API Gateway or Authentication Service.
- Action: Block request after N attempts.
- Response: Return a generic delay or error.
Showing this flow helps developers understand that the system is protected against automated attacks. Draw a side path for the rate limit trigger.
🛠️ Best Practices for Diagramming Security
To maintain clarity and accuracy, follow these guidelines when adding security to your communication diagrams.
- Consistent Notation: Define a legend for security elements. Use specific shapes or colors for tokens, certificates, and encrypted channels.
- Layer Separation: Do not mix security flows with business logic flows. Keep them distinct but connected.
- Focus on Data Flow: Show where sensitive data enters and leaves. Highlight the transformation of data (e.g., hashing, encryption).
- Include Timeouts: Security often depends on time. Show session timeouts and token expiration times where relevant.
- Review Regularly: As the system evolves, update the diagrams. Outdated security diagrams lead to outdated security practices.
🧩 Common Pitfalls to Avoid
Even experienced designers make mistakes when visualizing security. Be aware of these common errors.
1. Hiding the Token
Some diagrams show the token simply as a dashed line. This obscures the fact that the token is a critical piece of data that must be protected.
- Solution: Draw the token as a specific object with a label.
2. Ignoring Network Layer
A diagram might show the application layer but ignore the transport layer. Encryption at the transport level (TLS) is crucial.
- Solution: Add a note indicating that all communication uses encrypted transport.
3. Assuming Implicit Trust
Internal services often assume they are safe. However, a compromised internal service can still steal tokens.
- Solution: Treat all internal communication as potentially hostile. Verify identities.
4. Overcomplicating the View
Adding too many security details can make the diagram unreadable. Focus on the critical paths.
- Solution: Use separate diagrams for high-level flows and detailed security handshakes.
📝 Detailed Scenario: API Gateway Interaction
Consider a scenario where an API Gateway handles incoming requests. This component is the first line of defense. The diagram should show the Gateway interacting with the Authentication Service.
- Client Request: Client sends a request to the Gateway.
- Token Extraction: Gateway extracts the token from the header.
- Validation: Gateway calls the Authentication Service to validate the token.
- Forwarding: If valid, Gateway forwards the request to the backend service.
- Rejection: If invalid, Gateway returns a 401 Unauthorized response.
This flow centralizes security logic. The backend services do not need to validate the token themselves; they trust the Gateway. This reduces code duplication and potential security bugs.
📝 Detailed Scenario: Session State Management
Some systems rely on server-side sessions. The diagram must show the interaction with the Session Store.
- Login: User provides credentials.
- Session Creation: Server creates a session ID and stores it.
- Request: Client sends Session ID with subsequent requests.
- Validation: Server looks up Session ID in the store.
- Invalidation: On logout, Server deletes the session.
Ensure the Session Store is shown as a distinct component. This highlights the stateful nature of the system and the need to secure the storage medium.
🔍 Review Checklist for Security Diagrams
Before finalizing a diagram, run through this checklist to ensure security is adequately represented.
- ✅ Are all external boundaries clearly marked?
- ✅ Is encryption indicated for sensitive data?
- ✅ Are authentication tokens shown as distinct objects?
- ✅ Are error responses generic and non-revealing?
- ✅ Is there a logout or session termination flow?
- ✅ Are rate limits or throttling mechanisms shown?
- ✅ Is the trust boundary for each service defined?
- ✅ Are credentials never shown in plain text?
🧠 Integrating Security into the Design Process
Security diagrams should not be created in isolation. They must be part of the iterative design process. During the initial brainstorming, sketch the basic flows. During the design review, add the security layers. During the implementation phase, the diagram serves as a reference for coding standards.
This approach ensures that security is woven into the fabric of the system rather than added as a patch. It also facilitates communication between security engineers and application developers. When both teams look at the same diagram, they share a common language.
🔎 The Role of Documentation
A diagram is only as good as its accompanying documentation. The diagram shows the “what” and “where”. The documentation explains the “why” and “how”.
- Protocol Specifications: Link to the specific protocol standards used (e.g., OAuth 2.0, OIDC).
- Cryptographic Algorithms: Specify the hashing algorithms and cipher suites.
- Key Management: Describe how keys are stored and rotated.
- Incident Response: Outline what happens if a token is compromised.
Combining visual flow with textual detail creates a robust security specification. This reduces ambiguity and ensures consistent implementation across different parts of the system.
🎯 Final Thoughts
Security is a continuous process of verification and improvement. Communication diagrams are powerful tools for this process. They allow teams to visualize complex interactions and identify potential weaknesses before code is written. By focusing on authentication flows, trust boundaries, and error handling, architects can build systems that are resilient against attacks.
Remember that a diagram is a living document. As threats evolve, so should the security models they represent. Regular reviews and updates keep the system aligned with the latest security standards. Use the visual language of diagrams to make security transparent, understandable, and actionable for everyone involved in the project.
🛡️ Summary of Key Takeaways
- Visualize Trust: Clearly mark where trust boundaries exist.
- Show Tokens: Treat authentication tokens as critical data objects.
- Plan Errors: Ensure error paths do not leak information.
- Separate Concerns: Keep security flows distinct from business logic.
- Document Thoroughly: Support diagrams with detailed security specifications.
By adhering to these principles, teams can create communication diagrams that do more than show data flow—they show security posture. This clarity is essential for building trustworthy software systems in an increasingly connected world.