


Designing user experiences is a complex process that involves balancing aesthetics, functionality, and user needs. One of the most effective methods to validate concepts early in the development cycle is rapid prototyping. This approach allows designers to create tangible representations of their ideas without investing significant time or resources into full-scale development. By leveraging various techniques, teams can iterate quickly, gather feedback, and refine solutions before writing code.
In the modern digital landscape, speed and accuracy are paramount. Rapid prototyping bridges the gap between abstract thinking and concrete execution. It serves as a communication tool between stakeholders, developers, and users. This guide explores the essential techniques, workflows, and best practices for implementing effective rapid prototyping strategies within a UX design context.
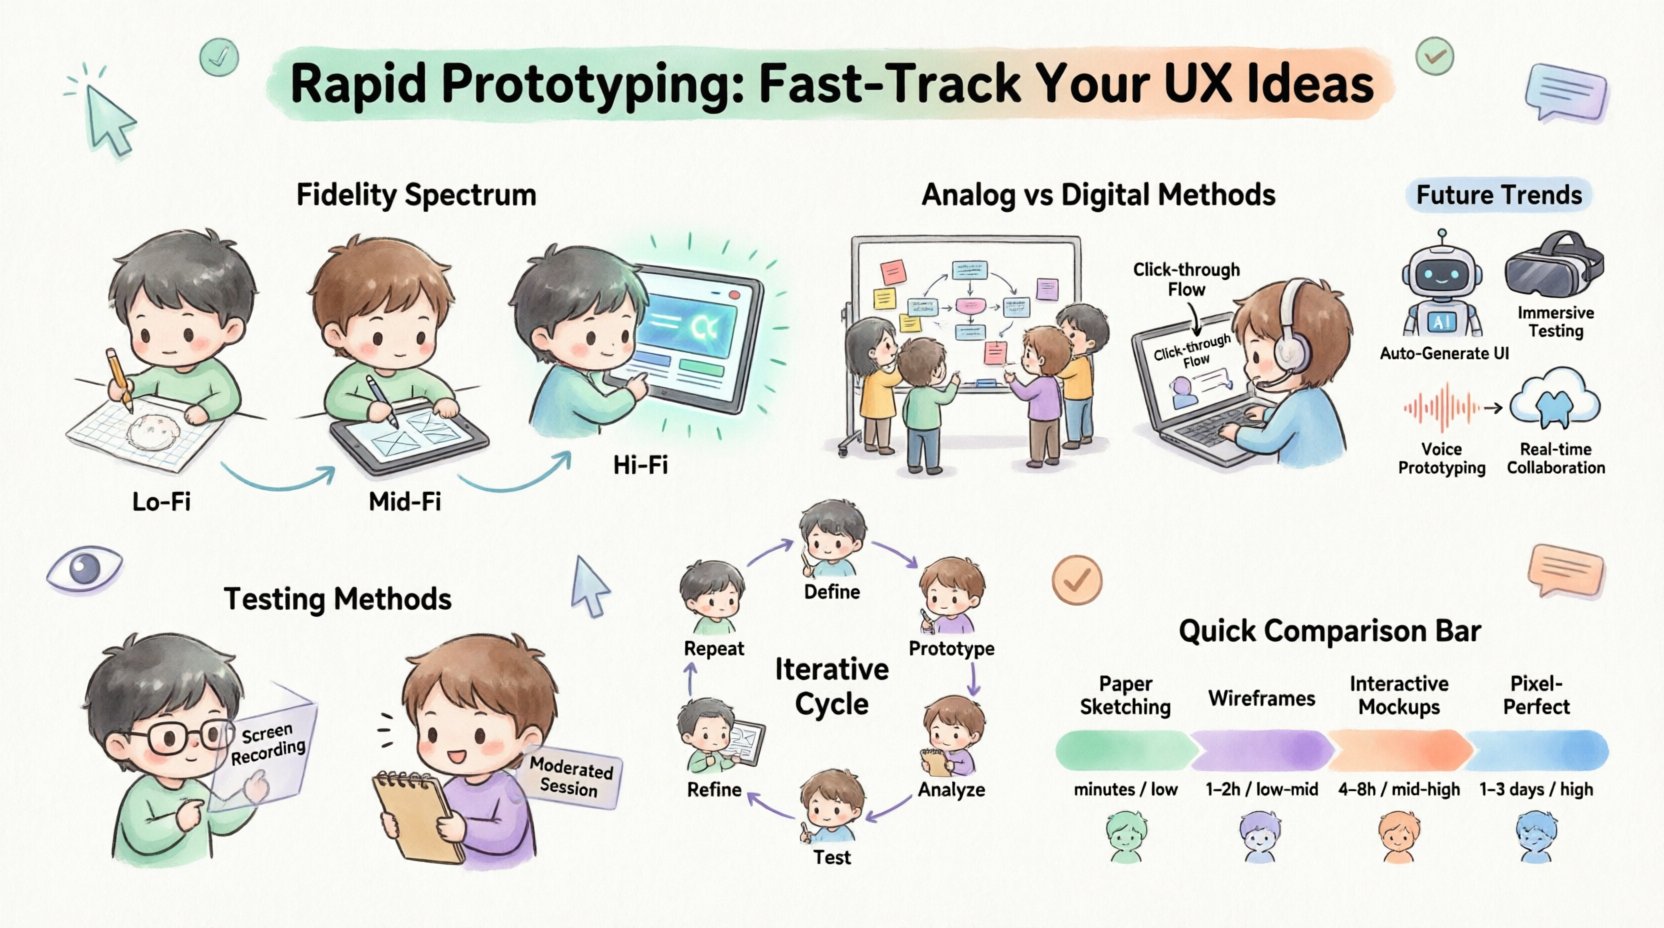
📐 Understanding the Prototyping Spectrum
Prototypes exist on a spectrum of fidelity. The level of detail determines the purpose of the prototype, the resources required to build it, and the feedback it elicits. Choosing the right level of fidelity is a strategic decision that depends on the project stage and specific goals.
- Low-Fidelity (Lo-Fi): These are rough sketches or simple wireframes. They focus on structure, layout, and flow rather than visual details. They are quick to produce and easy to modify.
- Mid-Fidelity: These prototypes add more structure and some visual hierarchy. They might include basic interactions but lack high-resolution graphics. They sit between the rough sketch and the final product.
- High-Fidelity (Hi-Fi): These look and feel like the final product. They include detailed visuals, typography, colors, and complex interactions. They are used for final validation and handoff.
Selecting the appropriate fidelity prevents wasted effort. Starting with high fidelity too early can lead to attachment to specific designs that might not work for the user. Conversely, staying in low fidelity too long might fail to capture the necessary nuance for stakeholder approval.
📝 Analog Techniques: Paper and Whiteboards
Before opening any digital software, the most accessible tool is often paper. Analog prototyping encourages collaboration and removes the barrier of technical skill. It signals to participants that the work is in progress and open to change.
1. Paper Sketching
Sketching on paper allows for rapid iteration. Designers can draw screens, buttons, and navigation elements in minutes. This method is ideal for:
- Brainstorming sessions
- Initial concept exploration
- Quick layout validation
When sketching, focus on the hierarchy of information. Use boxes for images, lines for text, and circles for interactive elements. Do not worry about perfect lines or alignment. The goal is to communicate the idea, not create art.
2. Storyboarding
Storyboarding extends beyond single screens to show a sequence of events. It maps out the user journey across multiple touchpoints. This technique helps visualize the context in which the product will be used.
- Context: Where is the user? (e.g., on a bus, at home)
- Goal: What is the user trying to achieve?
- Interaction: How do they interact with the interface?
- Outcome: What happens after the interaction?
3. Whiteboard Prototyping
Whiteboards are excellent for group collaboration. They allow multiple people to contribute simultaneously. Using different colored markers helps distinguish between different layers of information or interaction states.
This method is particularly useful for service design or complex workflows where multiple systems interact. It keeps the team aligned and ensures everyone understands the proposed solution.
💻 Digital Low-Fidelity Techniques
Once concepts are validated on paper, moving to digital tools allows for better organization and sharing. Digital low-fidelity prototyping maintains the speed of analog methods but adds structure and portability.
1. Wireframing
Wireframes are the blueprints of the digital product. They define the layout of elements without visual styling. They answer the question: “What goes where?”
- Structure: Grids and columns establish the underlying layout.
- Content: Placeholder text and images indicate where content will live.
- Navigation: Links and buttons are defined to show flow.
Wireframing tools typically offer drag-and-drop components. This allows designers to build screens quickly without worrying about pixel perfection. The focus remains on functionality and information architecture.
2. Click-Through Flows
A click-through flow connects wireframes to simulate navigation. Users can click a button and see the next screen appear. This creates a sense of movement without actual programming.
This technique is essential for validating navigation structures. It helps identify dead ends or confusing paths in the user journey. Stakeholders can click through the prototype to understand the scope of the project.
🎨 High-Fidelity Prototyping
When the structure is solid, it is time to apply visual polish. High-fidelity prototypes are used for usability testing with real users and for developer handoff. They provide a realistic view of the final experience.
1. Visual Design Integration
This stage involves applying the brand identity. Colors, typography, and imagery are introduced. The prototype begins to resemble the actual application.
- Consistency: Ensure styles are consistent across all screens.
- Accessibility: Check contrast ratios and font sizes.
- Micro-interactions: Add subtle animations for feedback, such as button presses or loading states.
2. Interactive Elements
High-fidelity prototypes can include complex interactions. These might include modal popups, form validation, or swipe gestures. The goal is to simulate the feel of the final product.
Advanced interactions require careful planning. They should not be overly complex to the point where they confuse the user during testing. The focus should remain on the core user tasks.
🧪 Usability Testing with Prototypes
A prototype is not useful unless it is tested. Usability testing involves observing real users interacting with the design to identify issues. This feedback loop is critical for refining the product.
1. Moderated Testing
In moderated testing, a facilitator guides the user through tasks. They can ask follow-up questions and observe body language. This provides deep qualitative insights.
- Task-Based: Give users specific goals to achieve.
- Think Aloud: Ask users to verbalize their thoughts as they navigate.
- Observation: Note where users hesitate or make errors.
2. Unmoderated Testing
Unmoderated testing allows users to complete tasks on their own time. They record their screen and voice while interacting with the prototype. This method is scalable and provides quantitative data.
- Volume: Test with more participants quickly.
- Context: Users test in their natural environment.
- Metrics: Track completion rates and time on task.
🔄 The Iterative Process
Prototyping is not a linear process; it is iterative. You will likely move back and forth between fidelity levels as new information emerges. This flexibility is a strength of the approach.
- Define: Identify the problem and the target audience.
- Prototype: Create a solution at the appropriate fidelity.
- Test: Gather feedback from users and stakeholders.
- Analyze: Review the data to find patterns and issues.
- Refine: Update the design based on findings.
- Repeat: Continue the cycle until the solution is robust.
Each iteration reduces the risk of building the wrong product. It ensures that the final release aligns with user expectations and business goals.
🤝 Collaboration and Handoff
Prototypes serve as the single source of truth for the entire team. They communicate design intent to developers, marketers, and stakeholders. Clear handoff ensures the design is built accurately.
1. Developer Communication
Developers need to understand the logic behind the design. Prototypes help clarify:
- States: How does an element look when hovered, clicked, or disabled?
- Responsiveness: How does the layout adapt to different screen sizes?
- Assets: What images and icons are required?
Sharing prototypes with developers early allows them to provide technical feedback. They might suggest alternatives that are easier to implement or perform better.
2. Stakeholder Alignment
Stakeholders often struggle to understand wireframes. High-fidelity prototypes help them visualize the end result. This reduces the likelihood of major changes later in the development process.
When presenting prototypes, focus on the user benefits. Explain how the design solves specific problems rather than just showing visual details.
🚫 Common Pitfalls to Avoid
Even with a solid process, mistakes can occur. Being aware of common pitfalls helps teams maintain efficiency and quality.
1. Over-Engineering Early
Spending too much time on high-fidelity visuals before validating the concept is a common mistake. If the core idea fails, the visual work is wasted. Start simple and add detail only when necessary.
2. Ignoring Accessibility
Prototypes should be accessible from the start. This includes ensuring logical tab orders, sufficient color contrast, and clear labeling. Accessibility is not an afterthought.
3. Skipping User Feedback
Designing in a vacuum leads to assumptions. Always validate with real users. Their feedback is the most reliable indicator of success.
4. Lack of Version Control
Without proper versioning, it is easy to lose track of changes. Keep organized files and document the rationale behind design decisions. This ensures the team can revert or reference past iterations.
📊 Comparing Prototyping Techniques
To assist in selecting the right approach, consider the following comparison of techniques based on time, cost, and fidelity.
| Technique | Time Required | Fidelity | Best Used For | Interaction Level |
|---|---|---|---|---|
| Paper Sketching | Minutes | Low | Ideation, Brainstorming | None (Manual) |
| Whiteboarding | 15-30 Minutes | Low | Workflows, Service Design | Low (Manual) |
| Digital Wireframes | 1-2 Hours | Low/Mid | Layout, Navigation | Click-Through |
| Interactive Mockups | 4-8 Hours | Mid/High | Usability Testing | High (Digital) |
| Pixel-Perfect Prototype | 1-3 Days | High | Final Validation, Handoff | High (Digital) |
Using this table, teams can plan their workflow more effectively. It helps manage expectations regarding time and resources.
🛠 Tools and Technology
While specific software names are not the focus, understanding the categories of tools is helpful. Different platforms offer different capabilities.
- Vector-Based Tools: Excellent for creating crisp shapes and layouts. They support layers and components.
- Flow Tools: Specialized in connecting screens and defining transitions. They focus on the user journey.
- Code-Based Prototypes: Writing code allows for the highest level of realism. It is often used for complex animations or logic.
- Cloud Platforms: Enable real-time collaboration. Multiple designers can work on the same file simultaneously.
The choice of tool depends on the team’s needs and the complexity of the project. The tool should serve the process, not dictate it.
🌟 Integrating with Agile Workflows
Rapid prototyping fits well within Agile methodologies. It supports the iterative nature of Agile development.
- Sprint Planning: Create prototypes for features planned in the sprint.
- Review: Demonstrate the prototype to the team and stakeholders.
- Feedback: Incorporate changes before development begins.
- Delivery: Hand off the final prototype to developers.
This integration ensures that design and development remain synchronized. It reduces the gap between design vision and technical implementation.
🔍 Measuring Success
How do you know if your prototyping efforts are paying off? Look for specific metrics and outcomes.
- Reduced Rework: Fewer changes during the development phase.
- Faster Time to Market: Validated ideas move to production quicker.
- Higher User Satisfaction: Positive feedback from usability testing.
- Better Stakeholder Confidence: Clearer understanding of the product value.
Tracking these outcomes helps justify the time spent on prototyping. It demonstrates the return on investment for the design team.
📈 Future Trends in Prototyping
The field of prototyping continues to evolve. New technologies and methods are emerging.
- AI-Assisted Design: Artificial intelligence can generate layouts and suggest components.
- VR/AR Prototyping: Creating immersive experiences for spatial interfaces.
- Voice Interfaces: Prototyping voice flows and conversational logic.
- Real-Time Collaboration: Cloud-based tools enabling global teamwork.
Staying informed about these trends ensures that teams remain competitive. Adopting new methods can improve efficiency and creativity.
✅ Final Thoughts
Rapid prototyping is a fundamental skill for modern UX designers. It transforms abstract ideas into tangible experiences that can be tested and improved. By using the right techniques at the right time, teams can build products that truly meet user needs.
The key to success lies in flexibility. Be willing to discard ideas that do not work. Embrace feedback as a guide rather than criticism. Use prototypes to facilitate conversation and shared understanding across the organization.
With practice, the process becomes intuitive. Designers can move from concept to reality with confidence and precision. This approach leads to better products, happier users, and more efficient workflows.