


🚀 Introduction to the Design Process
Entering the field of interaction design requires more than just an eye for aesthetics. It demands a structured approach to problem-solving that places the human experience at the center of every decision. This guide explores how design thinking serves as the backbone for successful user experience projects. For students beginning their journey, understanding this methodology is crucial for building robust portfolios and delivering value in professional settings.
Design thinking is not a linear checklist. It is a mindset. It encourages curiosity, empathy, and iteration. When applied correctly, it transforms vague problems into actionable solutions. This document breaks down the process into actionable steps, providing a roadmap for students to navigate complex design challenges without relying on specific tools or software platforms.
🧠 What Is Design Thinking?
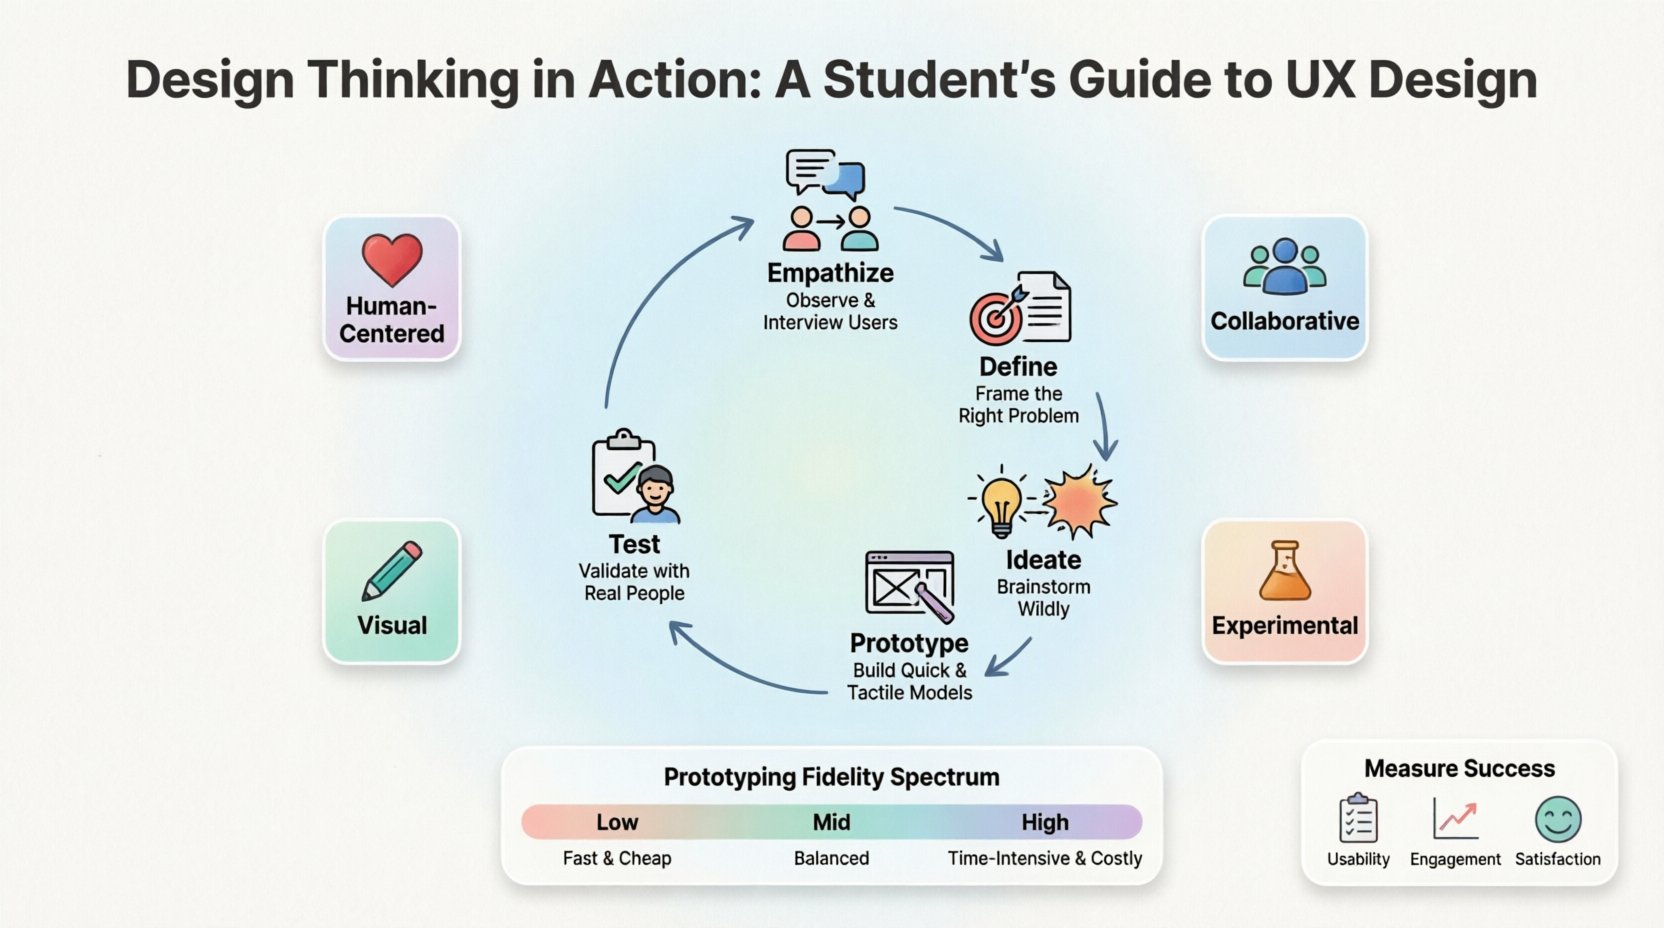
Design thinking is a non-linear, iterative process that teams use to understand users, challenge assumptions, redefine problems, and create innovative solutions to prototype and test. It involves five distinct stages, though these stages often overlap and repeat throughout a project lifecycle.
- Human-Centered: The focus remains on the needs, behaviors, and motivations of the people you are designing for.
- Collaborative: Diverse perspectives lead to better outcomes. Cross-functional teamwork is essential.
- Experimental: Failure is viewed as data. Prototypes are meant to be broken to learn how to fix them.
- Visual: Ideas are made tangible through sketches, diagrams, and models.
Many students mistake design thinking for simple brainstorming. While creativity is involved, the discipline relies on research and validation. You cannot design a solution without first understanding the problem space deeply. This distinction separates amateur work from professional-grade interaction design.
🔍 The Five Stages of Design Thinking
While the process is iterative, it is helpful to categorize activities into five core phases. Each phase contributes specific insights that inform the next.
1. Empathize: Understanding the User 🧑🤝🧑
The foundation of any successful design is empathy. This stage involves stepping into the shoes of your users to understand their emotional and functional needs. It is about listening rather than telling.
- Conduct Interviews: Ask open-ended questions. Avoid leading questions that suggest a specific answer.
- Observation: Watch users interact with existing solutions in their natural environment.
- Immersion: Experience the problem firsthand. If designing for a banking app, visit a bank branch to observe the physical interaction.
Key Deliverable: A collection of qualitative data points, quotes, and observations that form the basis of your user understanding.
2. Define: Framing the Problem 📝
Once you have gathered information, you must synthesize it into a clear problem statement. This stage turns raw data into a specific focus area. A well-defined problem is half-solved.
- User Personas: Create archetypes that represent different user segments. Give them names, goals, and pain points.
- Point of View (POV): Frame the problem from the user’s perspective. “How might we help a commuter save time while reducing stress?”
- Journey Maps: Visualize the current state of the user’s experience to identify friction points.
3. Ideate: Generating Solutions 💡
Now that the problem is defined, it is time to generate ideas. Quantity is often more important than quality at this stage. The goal is to diverge thinking before converging on the best option.
- Brainstorming Sessions: Encourage wild ideas. No criticism is allowed during the initial phase.
- SCAMPER Method: Substitute, Combine, Adapt, Modify, Put to another use, Eliminate, Reverse.
- Sketching: Rapidly draw concepts to visualize possibilities. Low-fidelity sketches save time and encourage iteration.
4. Prototype: Building Representations 🛠️
Prototyping turns ideas into tangible artifacts. It does not need to be functional code. A prototype is a tool for communication and testing.
- Low-Fidelity: Paper sketches, wireframes, or storyboards. Good for testing flow and layout.
- Mid-Fidelity: Digital wireframes with basic interactivity. Good for testing specific interactions.
- High-Fidelity: Visual designs that look like the final product. Good for testing visual hierarchy and content.
5. Test: Validating with Users 🧪
Testing is not the final step; it is a feedback loop. You take your prototypes back to users to see if your solution actually works.
- Usability Testing: Observe users attempting to complete tasks. Note where they hesitate or make errors.
- Feedback Collection: Ask users what they liked, what confused them, and what they missed.
- Iteration: Use the findings to refine the design. You may return to the Define or Ideate stage based on findings.
📊 Comparison of Prototyping Fidelity
| Type | Time Required | Best For | Cost |
|---|---|---|---|
| Low-Fidelity | Minutes to Hours | Concept Validation, Flow | Low (Paper, Pen) |
| Mid-Fidelity | Hours to Days | Interaction Testing, Structure | Medium (Digital Tools) |
| High-Fidelity | Days to Weeks | Visual Testing, Developer Handoff | High (Detailed Assets) |
🎯 Applying Design Thinking to Interaction Design
Interaction design focuses on the behavior of the system. It is about how a user moves through an interface. Applying design thinking here requires specific attention to feedback, states, and transitions.
Mapping User Flows
A user flow diagram outlines the path a user takes to complete a task. It is a visual representation of the interaction logic.
- Start Point: Where does the user enter the system?
- End Point: What is the successful completion state?
- Decision Nodes: Where do choices branch the path?
- Error States: What happens when things go wrong?
Design thinking ensures these flows are not just logical for the system, but logical for the human. For example, a user flow that makes sense to an engineer might confuse a novice user. Testing at the low-fidelity stage catches these gaps early.
Micro-Interactions
Micro-interactions are small moments of feedback within the interface. They confirm actions and provide status updates.
- Hover States: Visual cues that indicate clickability.
- Loading States: Feedback that the system is processing.
- Success Messages: Confirmation that a task was completed.
These details build trust. When a user clicks a button and receives immediate visual feedback, they feel in control. Design thinking helps determine which micro-interactions are necessary based on user needs rather than arbitrary decoration.
🛠️ Methods and Techniques for Students
There are numerous methods available to help students execute each stage of design thinking. Below is a list of practical techniques that do not require expensive software.
Empathy Mapping
This tool helps synthesize research data. It divides the canvas into four quadrants:
- Says: Direct quotes from interviews.
- Thinks: What the user might be thinking but not saying.
- Does: Observable behaviors.
- Feels: Emotional state during the experience.
Card Sorting
Useful for information architecture. Users organize topics into groups that make sense to them. This helps designers understand mental models for navigation structures.
- Open Card Sorting: Users create their own categories.
- Closed Card Sorting: Users sort items into pre-defined categories.
Task Analysis
Breaking down a task into individual steps to understand the cognitive load. This helps identify where users might get stuck or feel overwhelmed.
🚧 Common Pitfalls in the Process
Even with a solid framework, students often encounter obstacles. Recognizing these pitfalls early can save time and resources.
- Solution Jumping: Moving to prototyping before fully defining the problem. This leads to building the wrong thing efficiently.
- Designing for Yourself: Assuming your own preferences match the target audience. Always validate with real users.
- Ignoring Constraints: Focusing only on ideal scenarios. Budget, time, and technical limitations are real factors.
- Skipping Testing: Believing a design is perfect after internal review. External validation is non-negotiable.
🌍 Ethics and Accessibility
Modern interaction design carries a responsibility to be inclusive. Design thinking must account for the diverse needs of all potential users.
Accessibility Standards
Ensuring your design is usable by people with disabilities is a core ethical obligation. Key considerations include:
- Color Contrast: Text must be readable against backgrounds for users with low vision.
- Keyboard Navigation: Users should be able to access all features without a mouse.
- Screen Readers: Content must be structured logically for assistive technologies.
- Clear Language: Avoid jargon. Use plain language to ensure comprehension.
Bias in Research
Research samples often lack diversity. Students must actively seek participants from different backgrounds, ages, and abilities. A design that works for one group may exclude another. Inclusive design benefits everyone by creating more flexible and resilient systems.
📈 Measuring Success
How do you know if your design thinking process resulted in a good product? Success metrics vary by project, but generally fall into three categories.
| Category | Metrics | Definition |
|---|---|---|
| Usability | Task Success Rate, Time on Task | Can users complete the goal? |
| Engagement | Daily Active Users, Session Duration | Do users want to return? |
| Satisfaction | NPS, SUS Score | How do users feel about the experience? |
For students, the metric of success is often the learning outcome. Did you validate a hypothesis? Did you identify a new insight? These qualitative wins are just as valuable as quantitative data.
🎓 Building a Portfolio
When presenting your work, employers and educators look for the process, not just the final screens. A strong case study tells the story of the problem and the journey to the solution.
- Context: What was the project? What was the goal?
- Process: Show sketches, notes, and failed prototypes. This proves you did the work.
- Outcome: What was the result? Did the testing confirm the design worked?
- Reflection: What would you do differently next time? This shows growth.
Remember to explain your decisions. Why did you choose this layout? Why was this color chosen? Contextualizing your choices demonstrates your understanding of UX principles.
🔄 Continuous Learning
The field of user experience evolves rapidly. New platforms, new behaviors, and new technologies emerge constantly. Staying current is part of the professional responsibility.
- Read Industry Blogs: Follow thought leaders for trends and case studies.
- Join Communities: Engage with peers to discuss challenges and solutions.
- Study Psychology: Understanding human behavior is the core of UX.
- Analyze Competitors: Look at existing products to understand what works and what does not.
Design thinking provides a framework that remains relevant even as tools change. The ability to empathize, define, and test is a transferable skill that applies to any digital product or service.
📚 Final Thoughts for Students
Starting your career in interaction design is an exciting opportunity. You have the chance to shape how people interact with technology every day. By grounding your work in design thinking, you ensure that your solutions are meaningful and effective.
Focus on the user. Stay curious. Embrace the feedback loop. The path to great design is paved with questions, not just answers. Use this guide as a reference point as you build your skills and confidence in the field.
Keep iterating. Keep learning. Keep designing.