Entering the tech industry often begins with a focus on code. You learn syntax, logic, and infrastructure. However, the most successful products are built not just on robust backend systems, but on intuitive front-end experiences. This is where User Experience (UX) design comes in. For tech students, bridging the gap between engineering and design is a powerful career move. This guide outlines the essential steps to understanding UX design without relying on specific tools or hype.
Understanding the Landscape: What is UX? 🧭
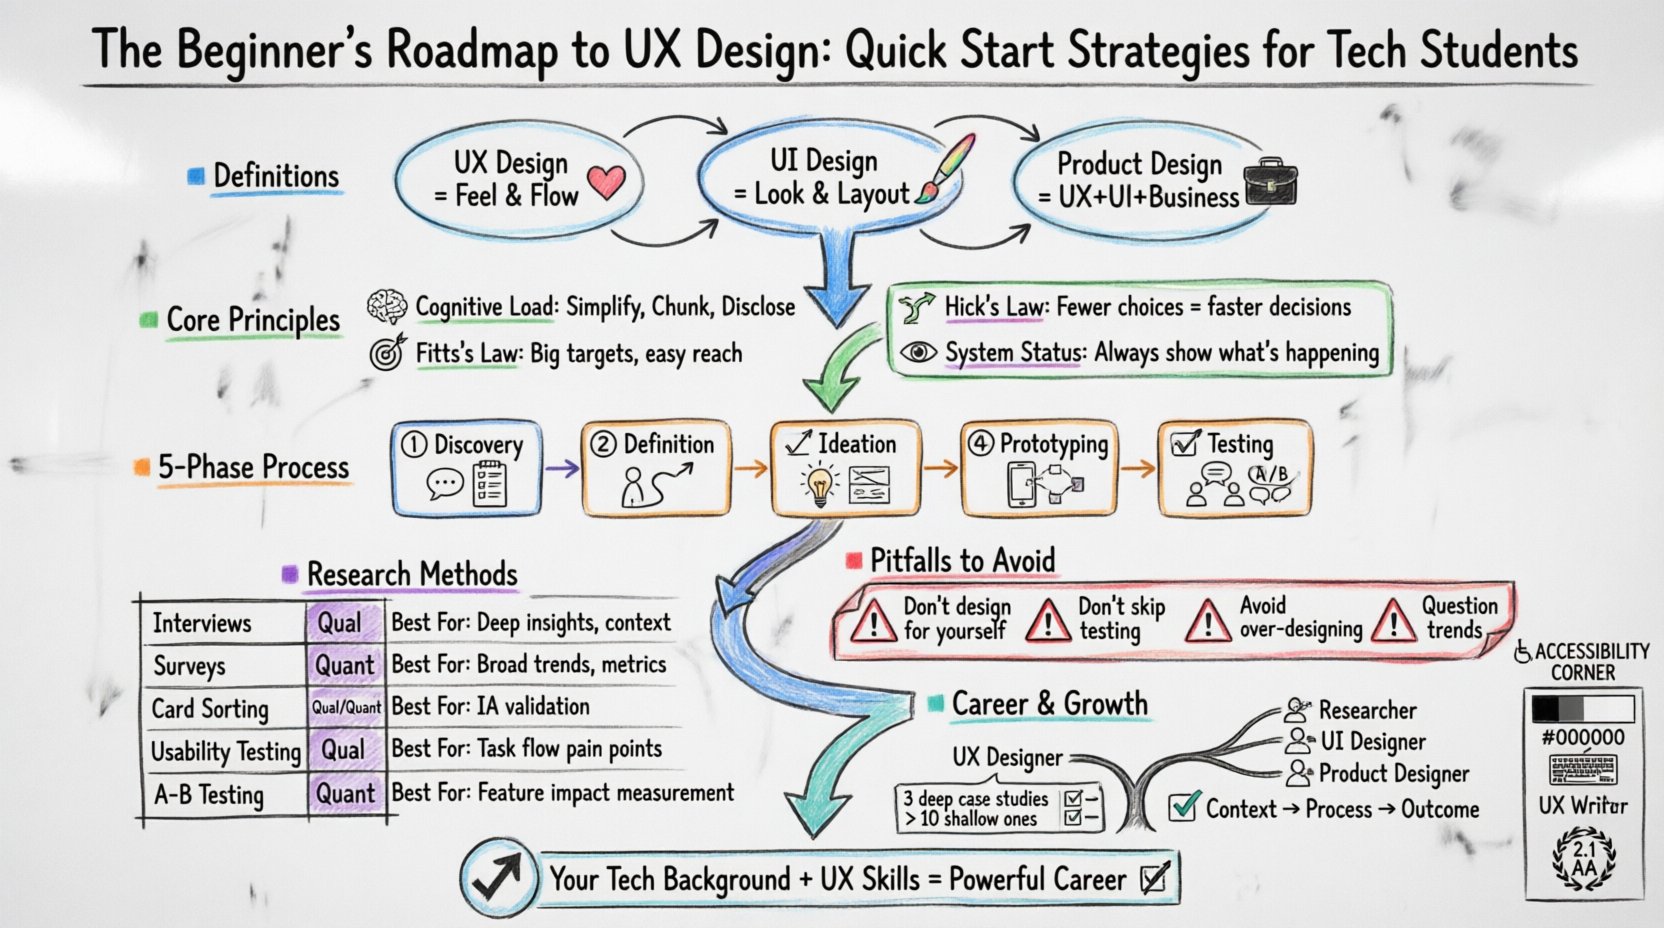
Before diving into techniques, it is necessary to define the discipline. UX design is the process of enhancing user satisfaction by improving the usability, accessibility, and pleasure provided in the interaction between a user and a product. It is distinct from User Interface (UI) design, which focuses on the visual layer.
- UX Design: Focuses on the overall feel of the experience, the flow, and the problem-solving aspect.
- UI Design: Focuses on the look and layout, including colors, typography, and buttons.
- Product Design: A broader term that often encompasses both UX and UI, along with business goals.
For a computer science student, this distinction is crucial. You are already familiar with the logic that powers an application. UX design adds the layer of human behavior on top of that logic. It asks questions like: Does this feature solve the user’s problem? Is the path to the goal clear? Why is the user hesitating at this step?
Core Principles of User Experience 🧠
Effective design relies on established principles derived from cognitive psychology. You do not need to guess what looks good; you can apply scientific laws to guide your decisions.
1. Cognitive Load Theory
The human brain has a limited capacity for processing information. When a design is too complex, it increases cognitive load, leading to frustration and abandonment. The goal is to minimize unnecessary mental effort.
- Simplify: Remove non-essential elements.
- Chunking: Group related information together to make it easier to digest.
- Progressive Disclosure: Show advanced options only when the user needs them.
2. Hick’s Law
This principle states that the time it takes to make a decision increases with the number and complexity of choices. If you present a user with ten options where they only need one, they may not choose anything at all.
- Limit primary navigation items.
- Use clear categories to organize complex data.
- Guide users toward the most likely action.
3. Fitts’s Law
This law predicts the time required to rapidly move to a target area. It depends on the distance to the target and the size of the target. In digital contexts, this means interactive elements must be large enough and positioned where they are easy to reach.
- Make buttons large enough for touch targets.
- Place critical actions where they are easily accessible.
- Avoid placing important links too close to other links.
4. Visibility of System Status
Users should always know what is happening. If a process is taking time, there should be a loading indicator. If a form is submitted, there should be confirmation.
- Provide feedback for every action.
- Indicate progress during multi-step processes.
- Clearly distinguish between active and inactive states.
The Design Process: A Step-by-Step Guide 🛠️
While tools vary, the methodology remains consistent. This workflow ensures that you are solving the right problem before you start building the solution.
Phase 1: Discovery and Research
Before drawing anything, you must understand the context. This phase involves gathering data about the users and the business goals. You cannot design for “everyone”; you must design for a specific audience.
- Stakeholder Interviews: Understand what the business wants to achieve.
- Competitor Analysis: Look at similar products to see what works and what fails.
- User Interviews: Talk to potential users to understand their pain points.
- Surveys: Gather quantitative data on a larger scale.
Phase 2: Definition and Strategy
Once you have data, you synthesize it to define the problem. This is where you create user personas and journey maps.
- Personas: Fictional characters representing your user groups.
- Journey Maps: Visual diagrams showing the steps a user takes to achieve a goal.
- Problem Statements: Clear definitions of the issue you are addressing.
Phase 3: Ideation and Wireframing
This is the sketching phase. You explore multiple solutions without committing to final visuals. The goal is to establish structure and hierarchy.
- Brainstorming: Generate as many ideas as possible.
- Sketching: Quick, rough drawings to explore layout.
- Wireframing: Low-fidelity blueprints that show placement of elements.
- Information Architecture: Organizing content logically.
Phase 4: Prototyping
A prototype is a simulation of the final product. It allows users to interact with the design before development begins. This saves time and money by catching errors early.
- Low-Fidelity Prototypes: Basic clickable sketches.
- High-Fidelity Prototypes: Close to the final look and feel.
- Interactive Flows: Connecting screens to show navigation.
Phase 5: Testing and Validation
Never assume your design works. You must test it with real users to validate your assumptions.
- Usability Testing: Watch users try to complete tasks.
- A/B Testing: Compare two versions to see which performs better.
- Accessibility Audits: Ensure the design is usable by people with disabilities.
Research Methods Overview 📊
Selecting the right research method is critical. Here is a breakdown of common techniques used in the industry.
| Method | Type | Best Used For |
|---|---|---|
| Interviews | Qualitative | Deep understanding of motivations and behaviors |
| Surveys | Quantitative | Gathering data from a large number of people |
| Card Sorting | Qualitative | Understanding how users categorize information |
| Usability Testing | Qualitative | Identifying friction points in the interface |
| A/B Testing | Quantitative | Validating design changes with live traffic |
Accessibility and Inclusivity ♿
Designing for accessibility is not optional; it is a requirement. An accessible product serves a wider audience and often provides a better experience for everyone. Tech students should prioritize this from day one.
- Color Contrast: Ensure text is readable against backgrounds. Low vision users rely on high contrast.
- Keyboard Navigation: Ensure all functions can be accessed without a mouse.
- Screen Readers: Use proper semantic HTML tags so assistive technology can read the content.
- Text Resizing: Allow users to scale text without breaking the layout.
Adhering to the Web Content Accessibility Guidelines (WCAG) is the standard practice. This includes providing alt text for images and ensuring forms have clear labels.
Building a Strong Portfolio 📁
When you are looking for opportunities, your portfolio is your most important asset. It demonstrates your ability to think, not just your ability to draw. For students, projects can come from class assignments, personal ideas, or volunteer work.
What to Include
- Case Studies: Detailed write-ups of specific projects.
- Process Documentation: Show your sketches, research, and iterations.
- Problem Solving: Explain the problem you solved and the impact of your solution.
- Visuals: Include wireframes, prototypes, and final designs.
Case Study Structure
- Overview: Brief summary of the project.
- The Problem: What issue needed solving?
- Research: What did you learn from users?
- Solution: How did you solve the problem?
- Results: What was the outcome or what would you measure?
Quality is better than quantity. Three deep, well-documented case studies are better than ten shallow ones.
Career Trajectories in UX 👔
The field is broad, and there are many paths you can take depending on your interests and strengths.
- UX Designer: Focuses on the overall experience and flow of the product.
- UX Researcher: Specializes in gathering and analyzing user data.
- UI Designer: Focuses on the visual design and styling.
- Product Designer: Handles both UX and UI, often working closer with product management.
- UX Writer: Focuses on the copy and micro-interactions within the interface.
For tech students, a hybrid role is often available. Your coding background allows you to speak the language of developers, which makes you a valuable asset in cross-functional teams.
Common Pitfalls to Avoid ⚠️
Even with good intentions, beginners often make mistakes that hinder the design process. Being aware of these can save you time.
- Designing for Yourself: Assume your users are different from you. Validate with real data.
- Ignoring Constraints: Consider technical and business limitations early in the process.
- Over-Designing: A simple solution is often better than a complex one.
- Skipping Testing: Always test your assumptions before finalizing the design.
- Using Trends Blindly: Just because a design trend is popular does not mean it fits your product.
Continuous Learning and Growth 📚
The industry evolves rapidly. New patterns emerge, and user expectations shift. To stay relevant, you must commit to lifelong learning.
- Read Books: Invest time in foundational texts on design and psychology.
- Follow Blogs: Read industry publications to stay updated on trends.
- Attend Workshops: Participate in events to network and learn new skills.
- Build Side Projects: Apply what you learn to personal projects to reinforce knowledge.
- Seek Feedback: Ask peers and mentors to critique your work.
Collaboration is key. Work with developers, product managers, and other designers. Understanding how your work fits into the larger ecosystem will make you a more effective professional.
Conclusion: Your Next Steps 🎯
Starting a journey in UX design as a tech student gives you a significant advantage. You understand the constraints of technology, which allows you to design feasible and efficient solutions. By focusing on user needs, applying psychological principles, and rigorously testing your work, you can build products that truly make a difference.
Begin by analyzing the apps you use daily. Ask yourself why certain decisions were made. Start small with a wireframe for a problem you have encountered. The path to expertise is built on consistent practice and a willingness to learn from failure. Your background in technology is a solid foundation; now, layer the human element on top of it.